> ## Documentation Index
> Fetch the complete documentation index at: https://docs.makeswift.com/llms.txt
> Use this file to discover all available pages before exploring further.
# Authentication
> Create an app and get your API key to authenticate with the Makeswift REST API.
export const ReadinessBadge = ({type}) => {
const validTags = ["beta", "alpha", "experimental"];
const tagText = type?.trim().toLowerCase();
if (!tagText || !validTags.includes(tagText)) return null;
useEffect(() => {
const titleElement = document.querySelector("#page-title, .page-title, h1");
if (!titleElement) return;
if (titleElement.querySelector(".badge")) return;
const badge = document.createElement("span");
badge.className = `badge ${tagText}-badge`;
badge.textContent = tagText;
badge.style.transform = "translateY(-3px)";
titleElement.appendChild(badge);
}, []);
return null;
};
To use the Makeswift REST API, you'll need to create an app and obtain an API key. This guide walks you through the setup process.
While both API Key and Bearer Token authentication methods are supported, you must use **only one** authentication method per request. Requests that include both an API Key and Bearer Token will be rejected.
## Prerequisites
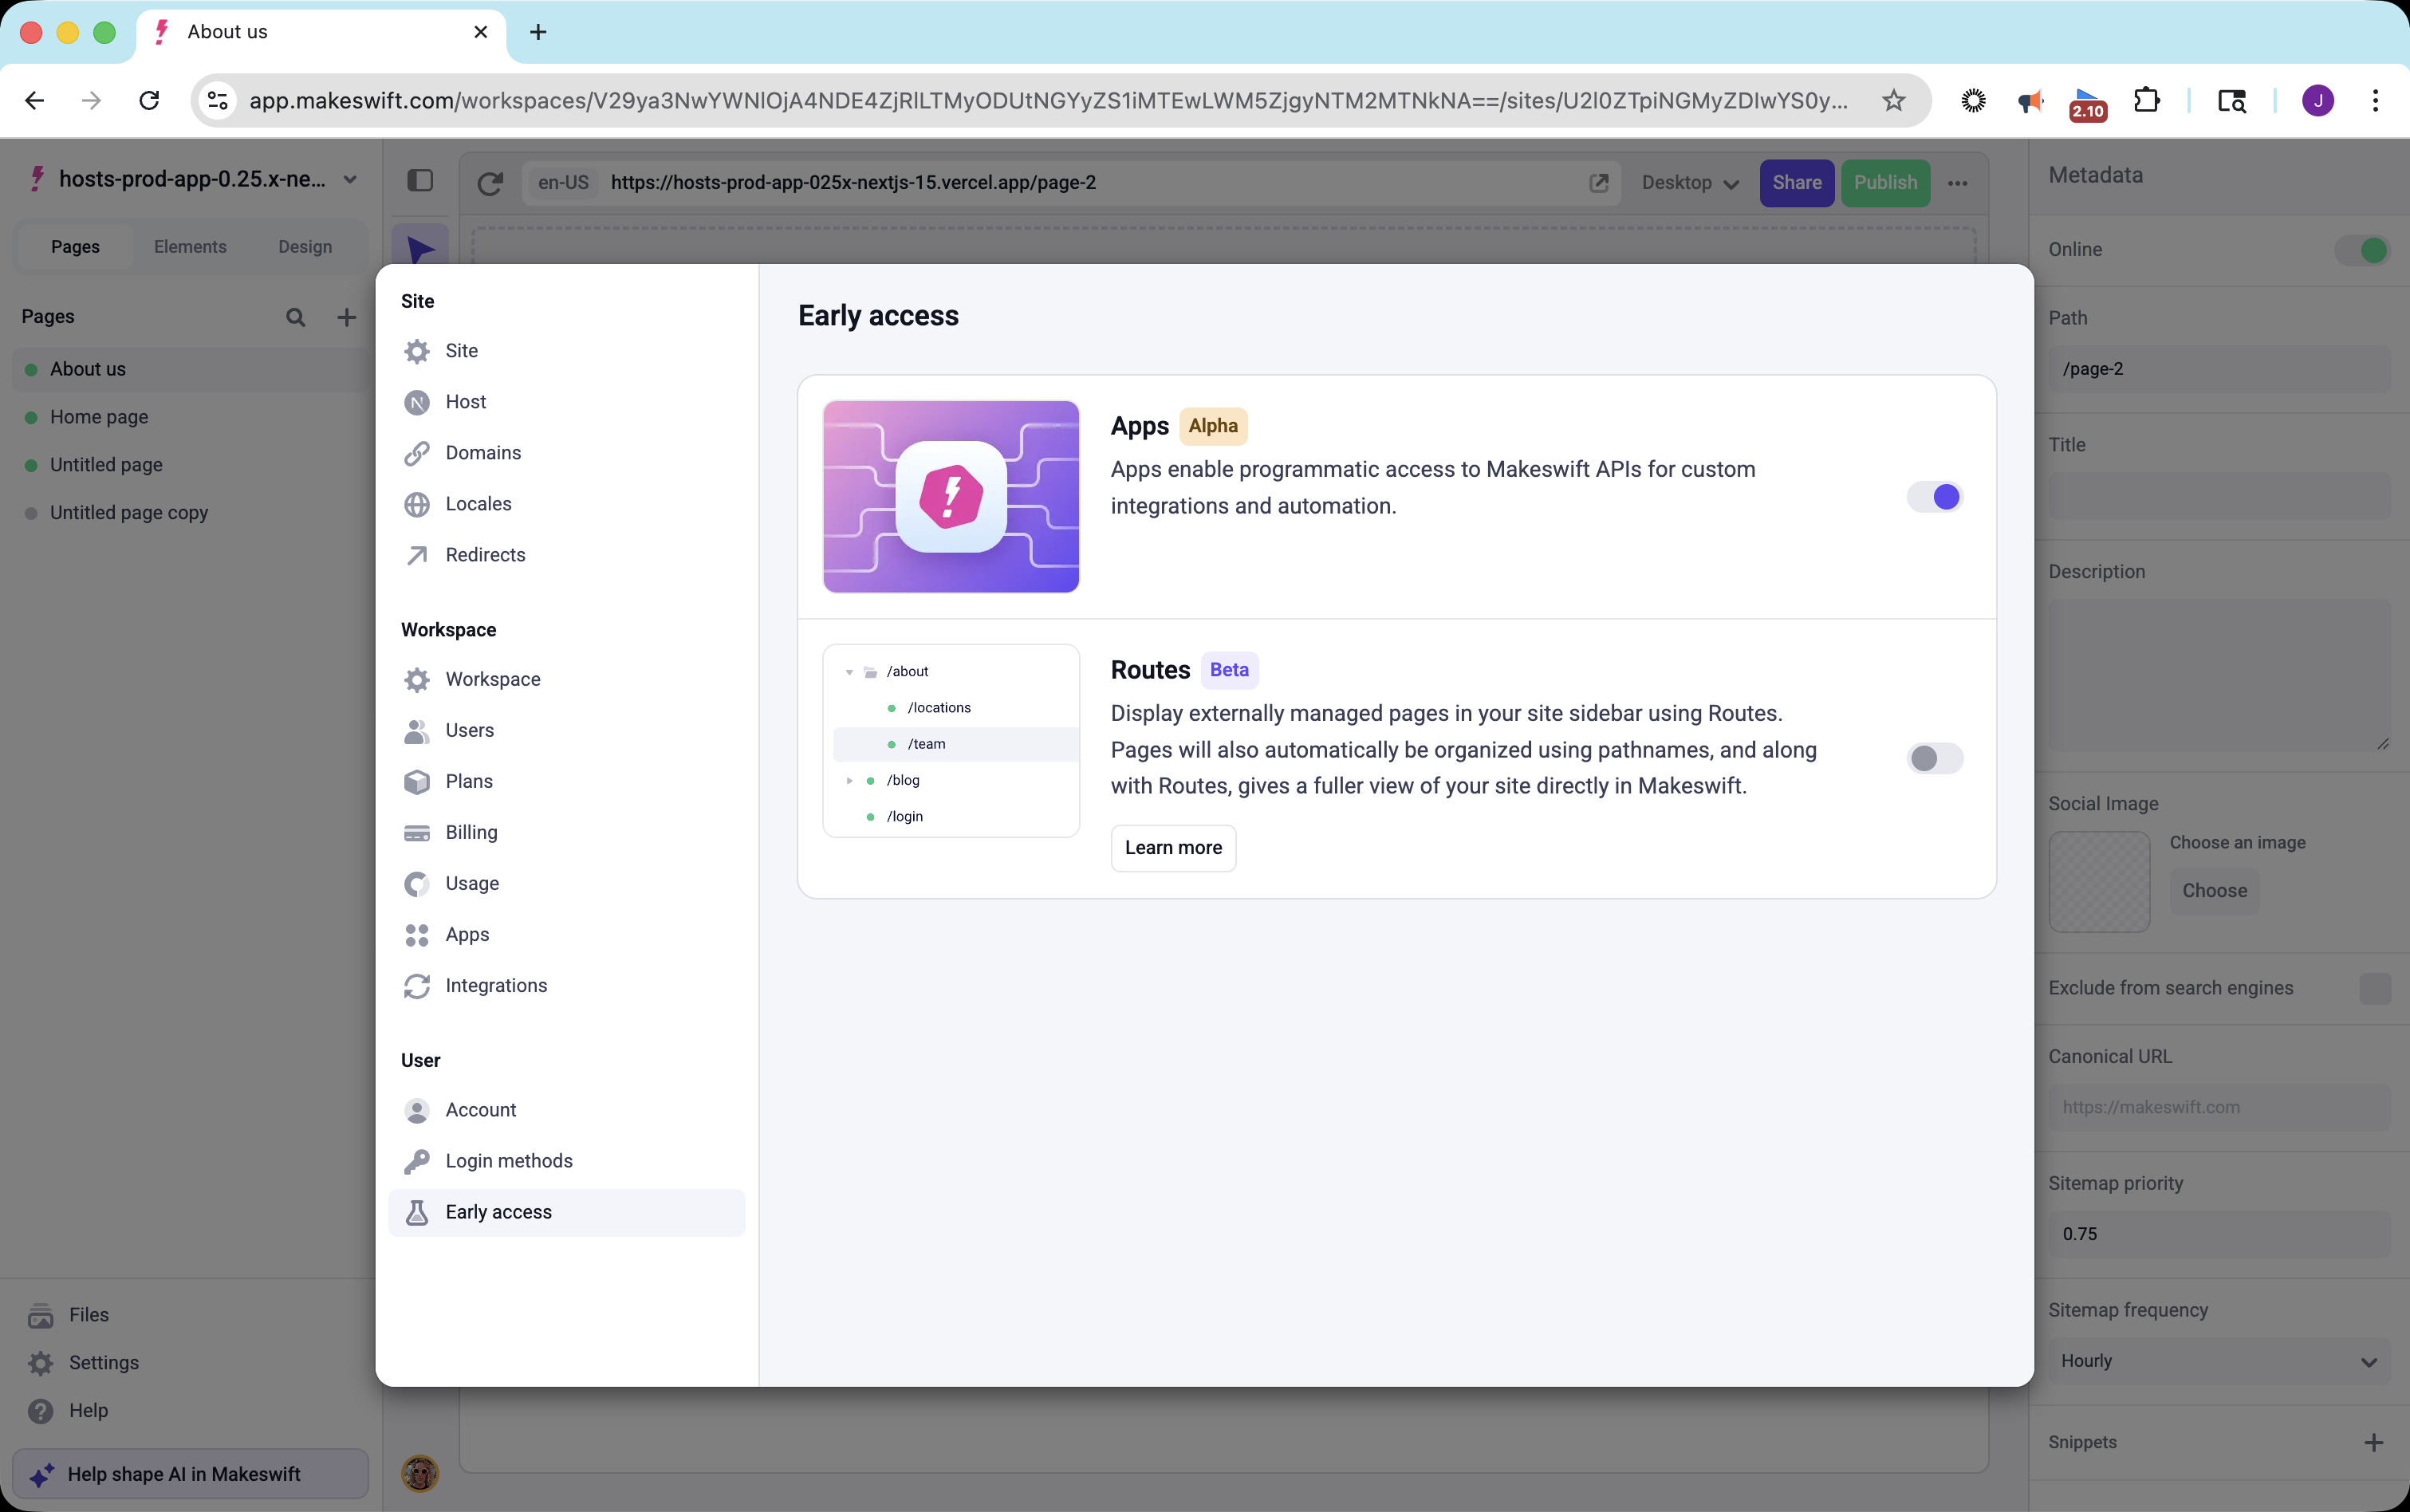
Apps is currently an early access feature. You'll need to enable it before you can create an app.
## Enable Apps early access
1. Open **Settings** in the Makeswift builder
2. Navigate to **User** → **Early access**
3. Toggle on **Apps**
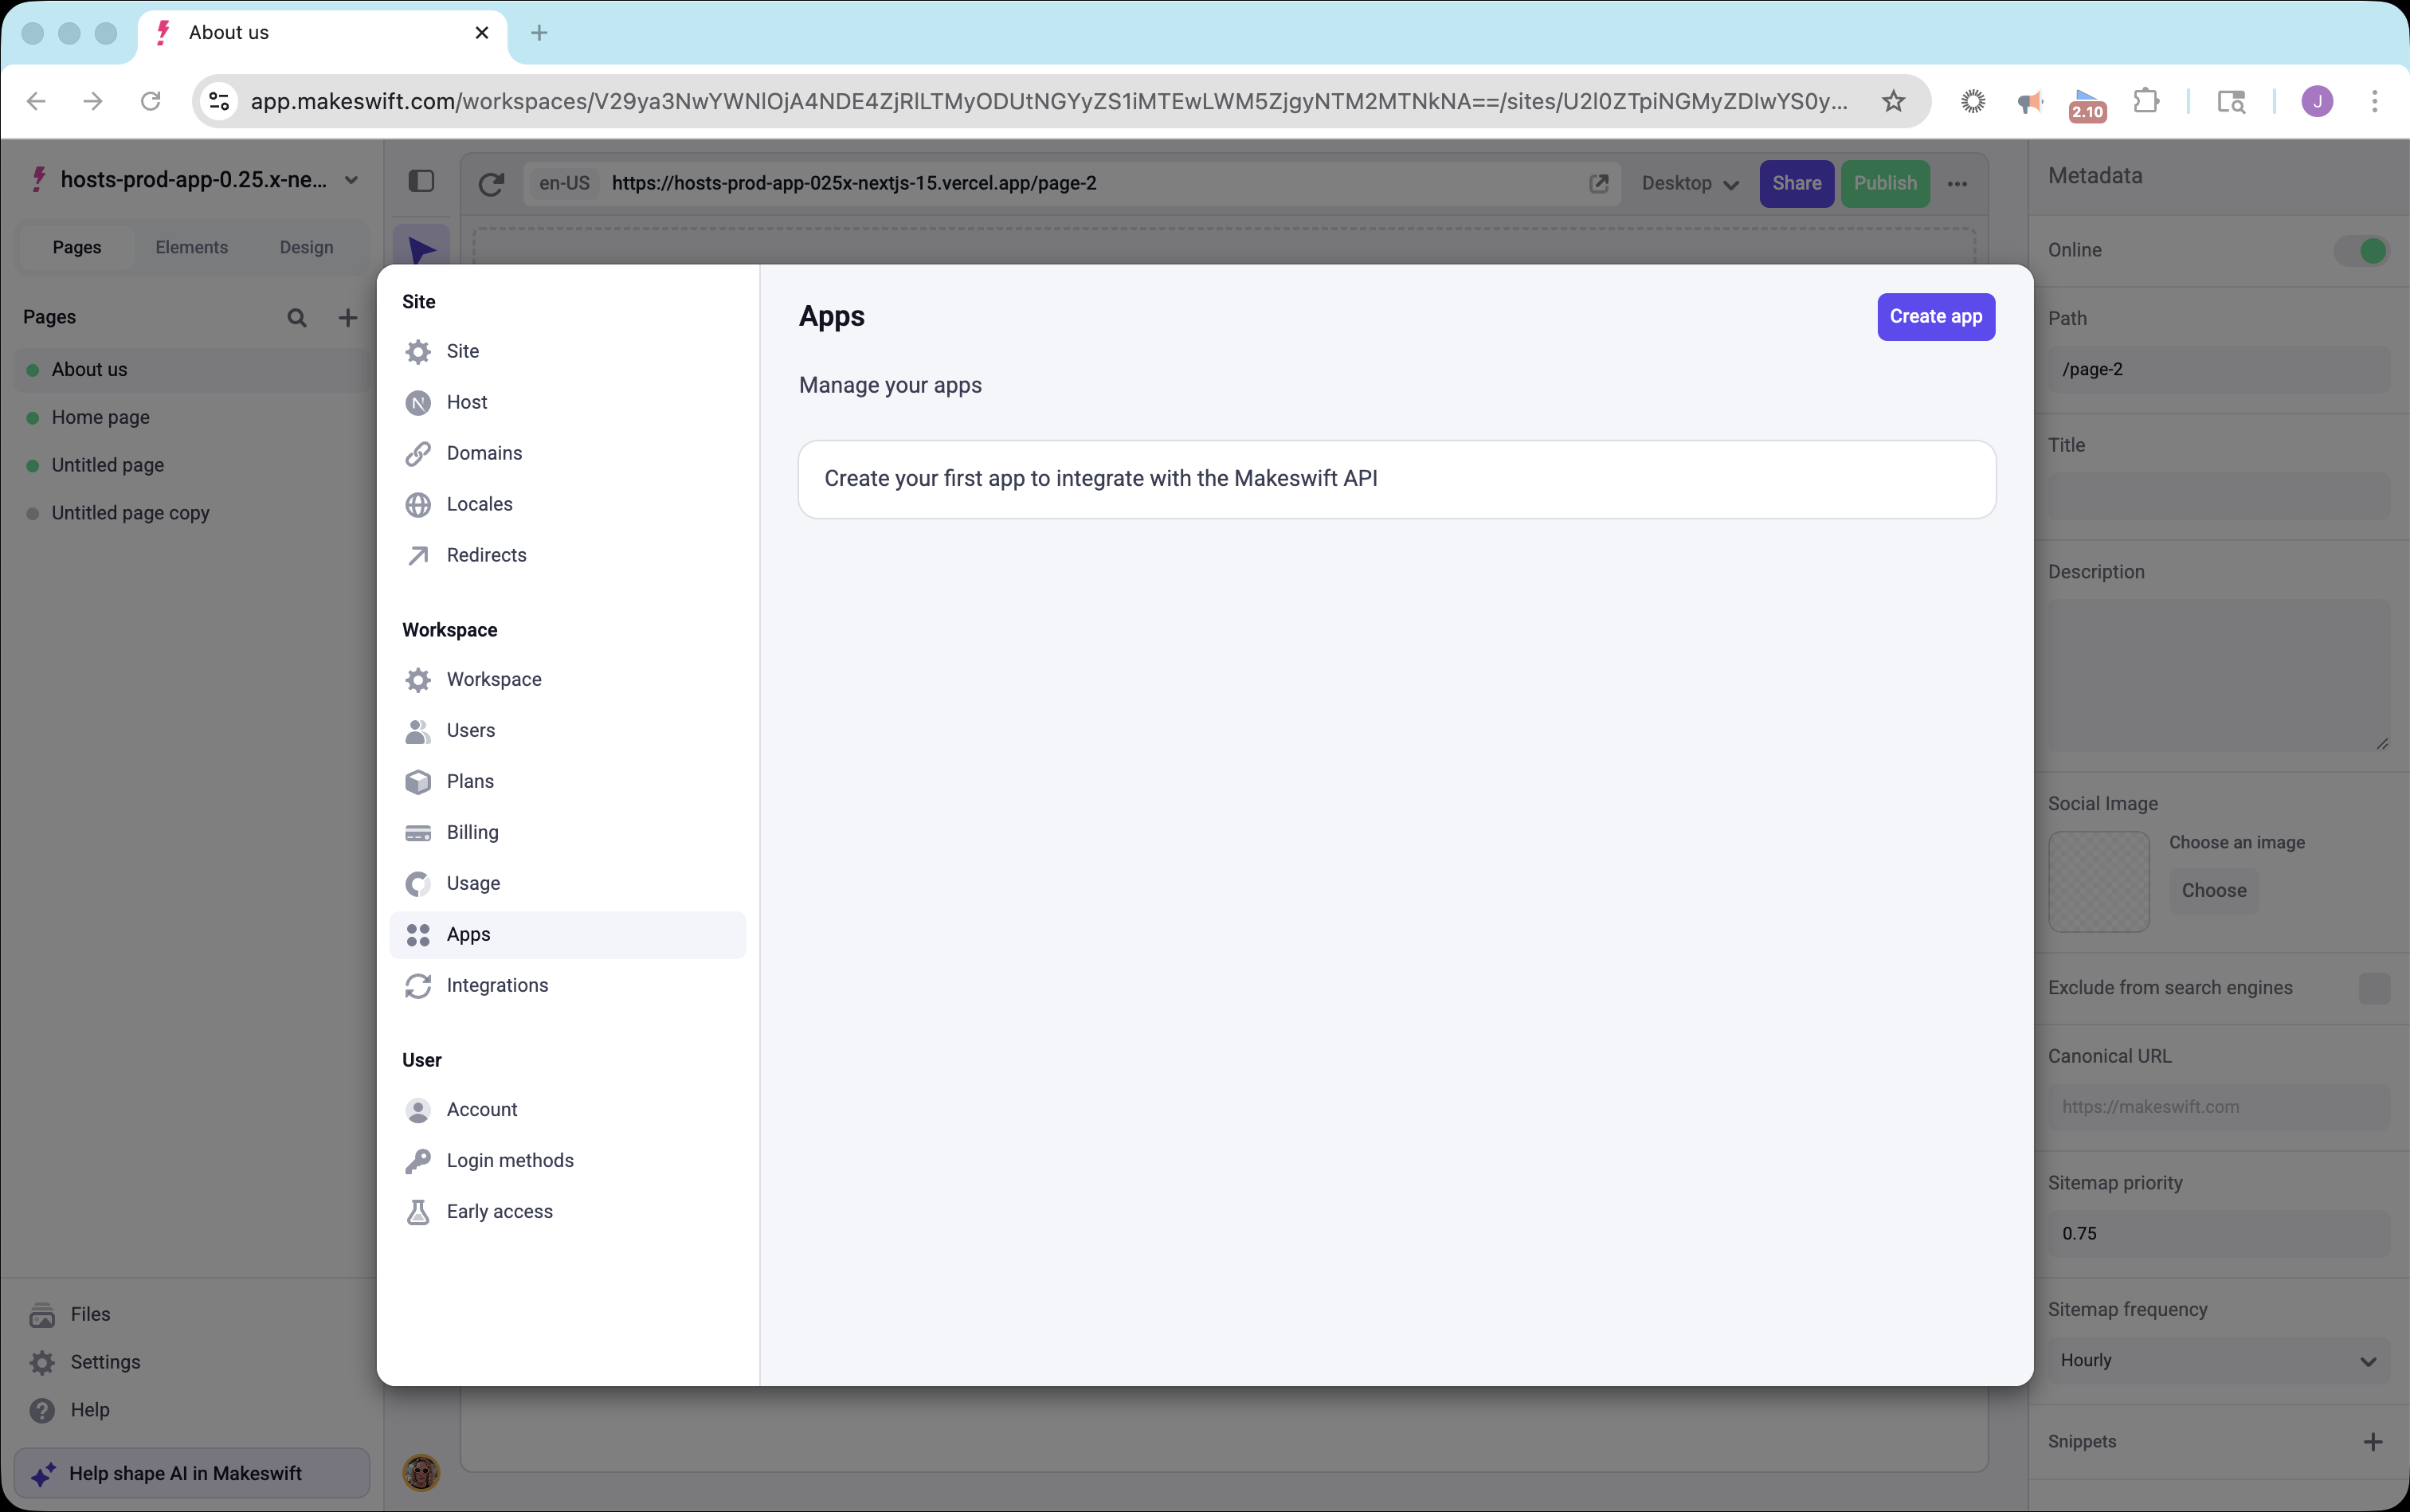
 ## Create an app
Once Apps is enabled, you can create your first app:
1. Open **Settings** in the Makeswift builder
2. Navigate to **Workspace** → **Apps**
3. Click **Create app**
## Create an app
Once Apps is enabled, you can create your first app:
1. Open **Settings** in the Makeswift builder
2. Navigate to **Workspace** → **Apps**
3. Click **Create app**
 4. Enter a **Name** for your app
5. Optionally, choose an **Icon** and add a **Description**
6. Click **Continue**
4. Enter a **Name** for your app
5. Optionally, choose an **Icon** and add a **Description**
6. Click **Continue**
 ## Copy your API key
After creating your app, you'll be shown your API key. This is the only time the key will be displayed.
Save your API key immediately. It won't be shown again after you close the
dialog. If you lose it, you'll need to create a new app.
## Copy your API key
After creating your app, you'll be shown your API key. This is the only time the key will be displayed.
Save your API key immediately. It won't be shown again after you close the
dialog. If you lose it, you'll need to create a new app.
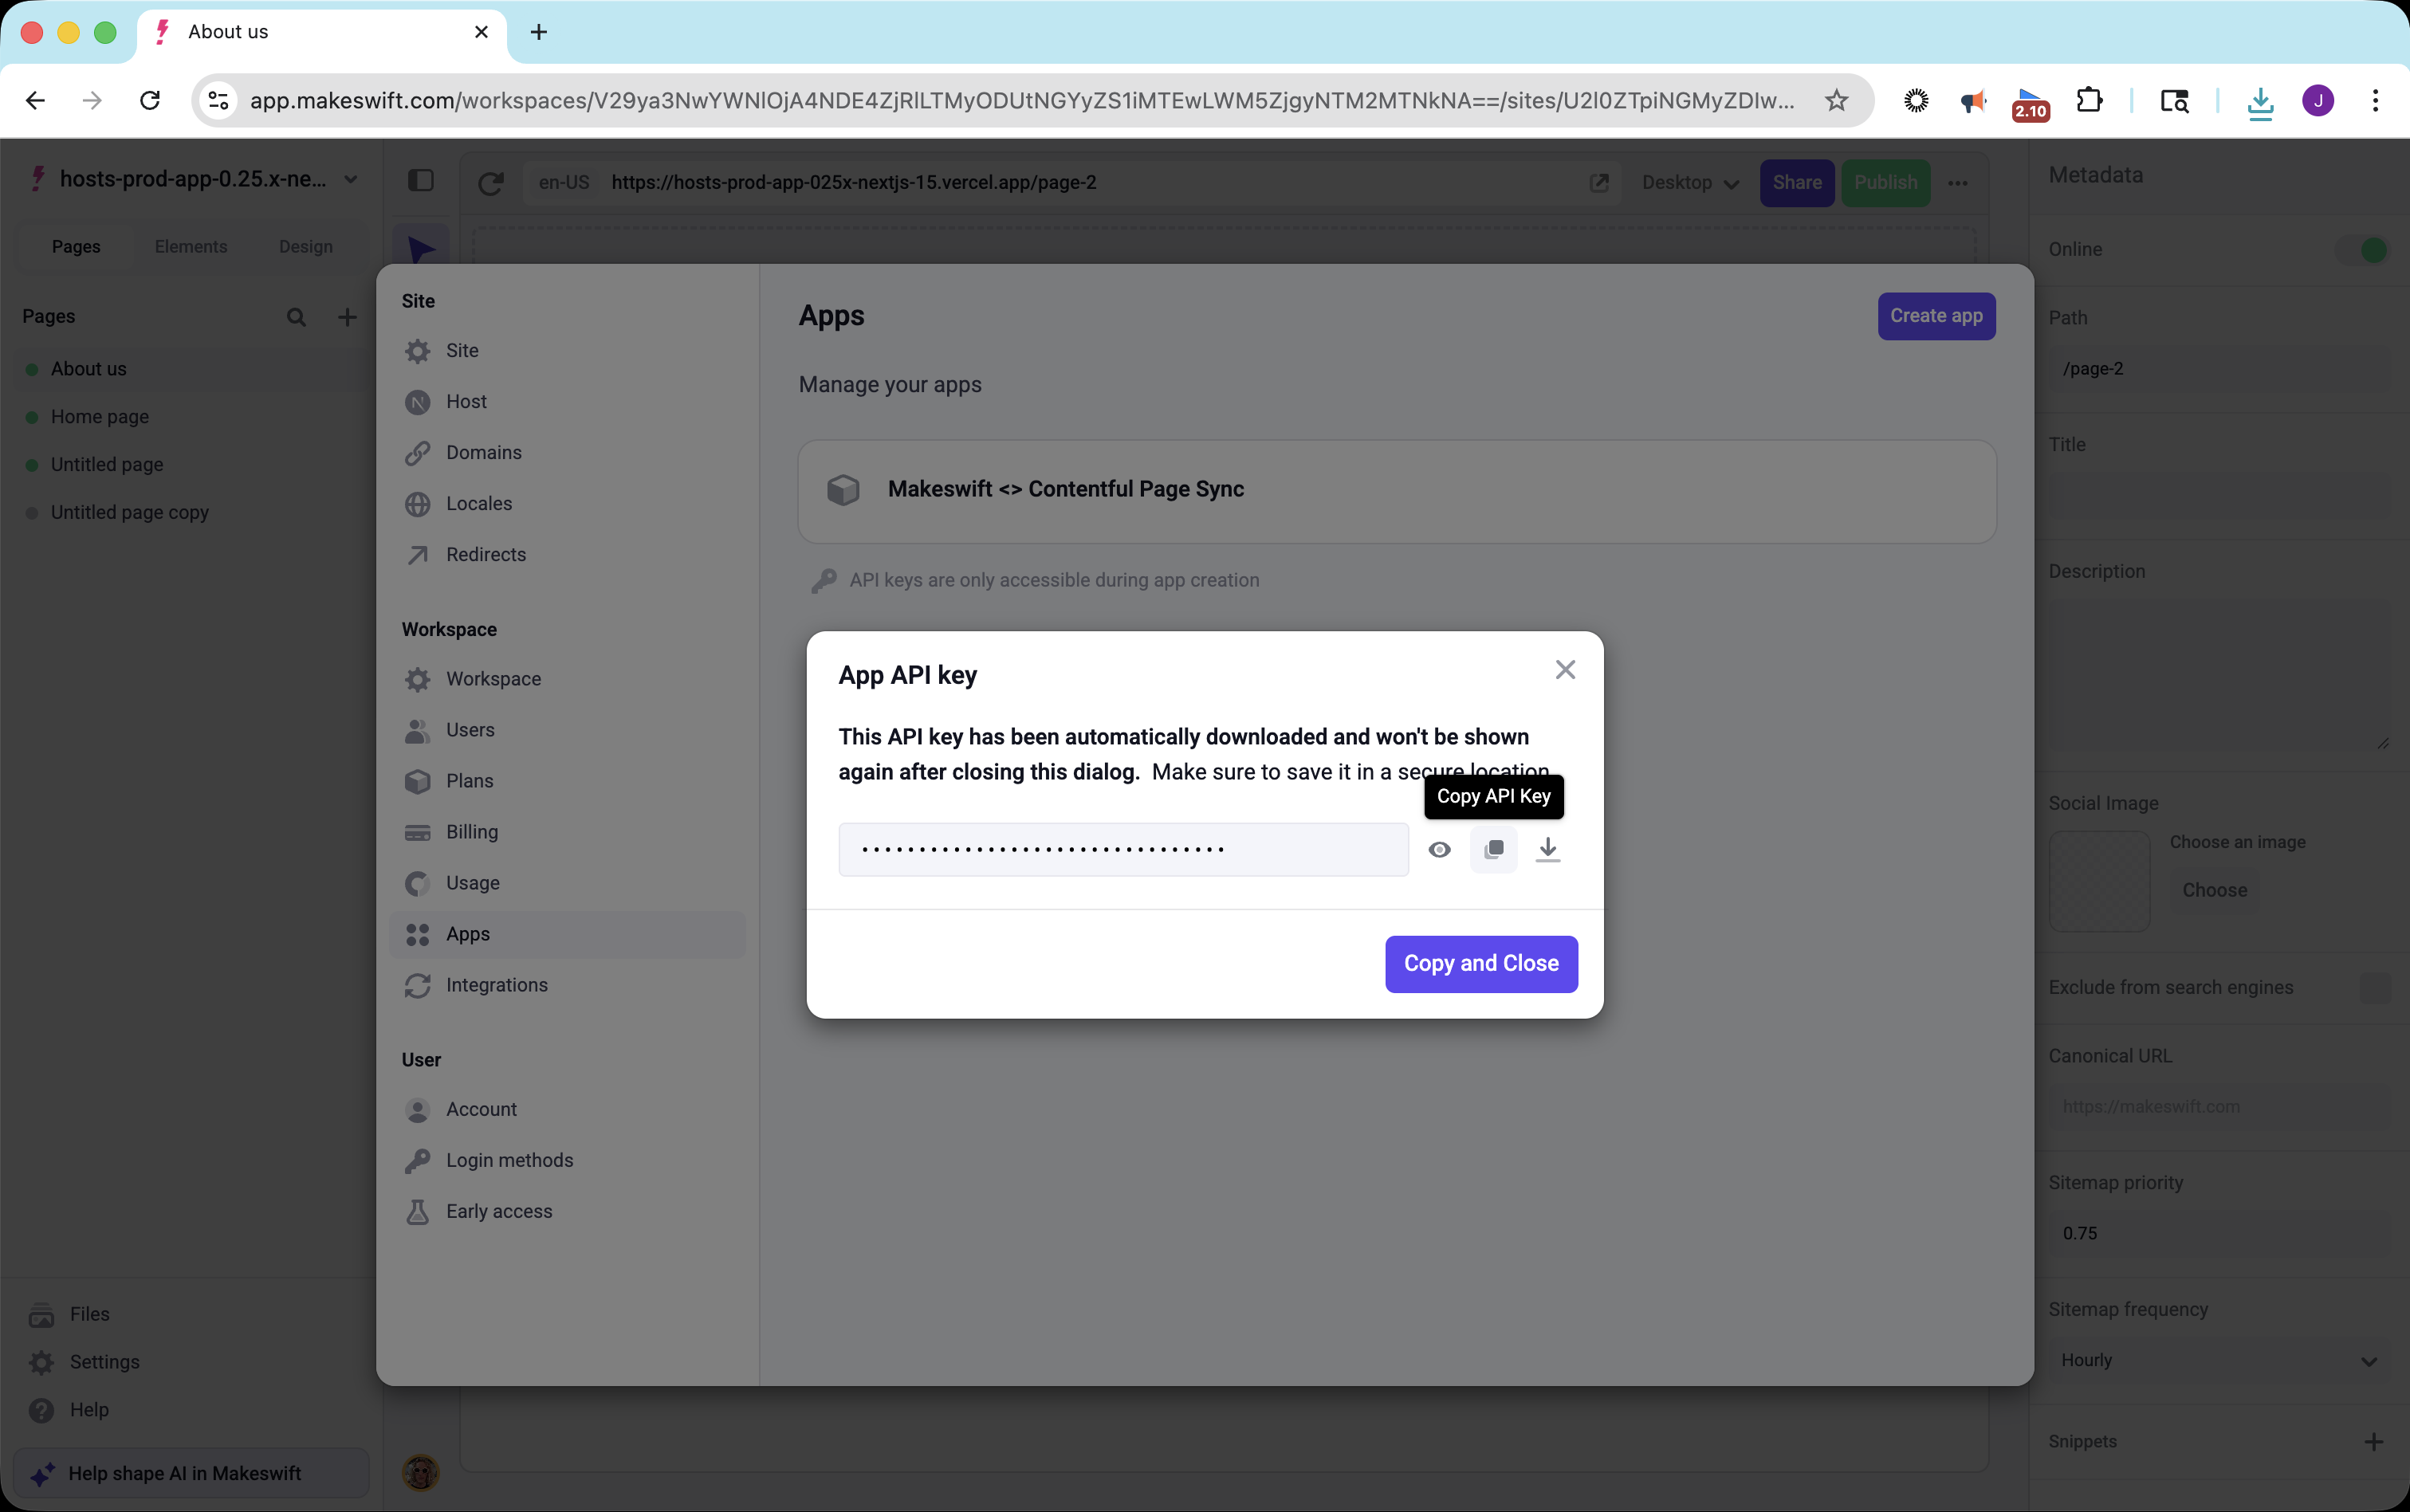 1. Click the **Copy** button or **Copy and Close** to copy the API key
2. Store the key securely (e.g., in environment variables or a secrets manager)
## Get your Site ID
Many API endpoints require a Site ID. To find it:
1. Open **Settings** in the Makeswift builder
2. Navigate to **Site** → **Site**
3. Copy the **Site Id** value
1. Click the **Copy** button or **Copy and Close** to copy the API key
2. Store the key securely (e.g., in environment variables or a secrets manager)
## Get your Site ID
Many API endpoints require a Site ID. To find it:
1. Open **Settings** in the Makeswift builder
2. Navigate to **Site** → **Site**
3. Copy the **Site Id** value
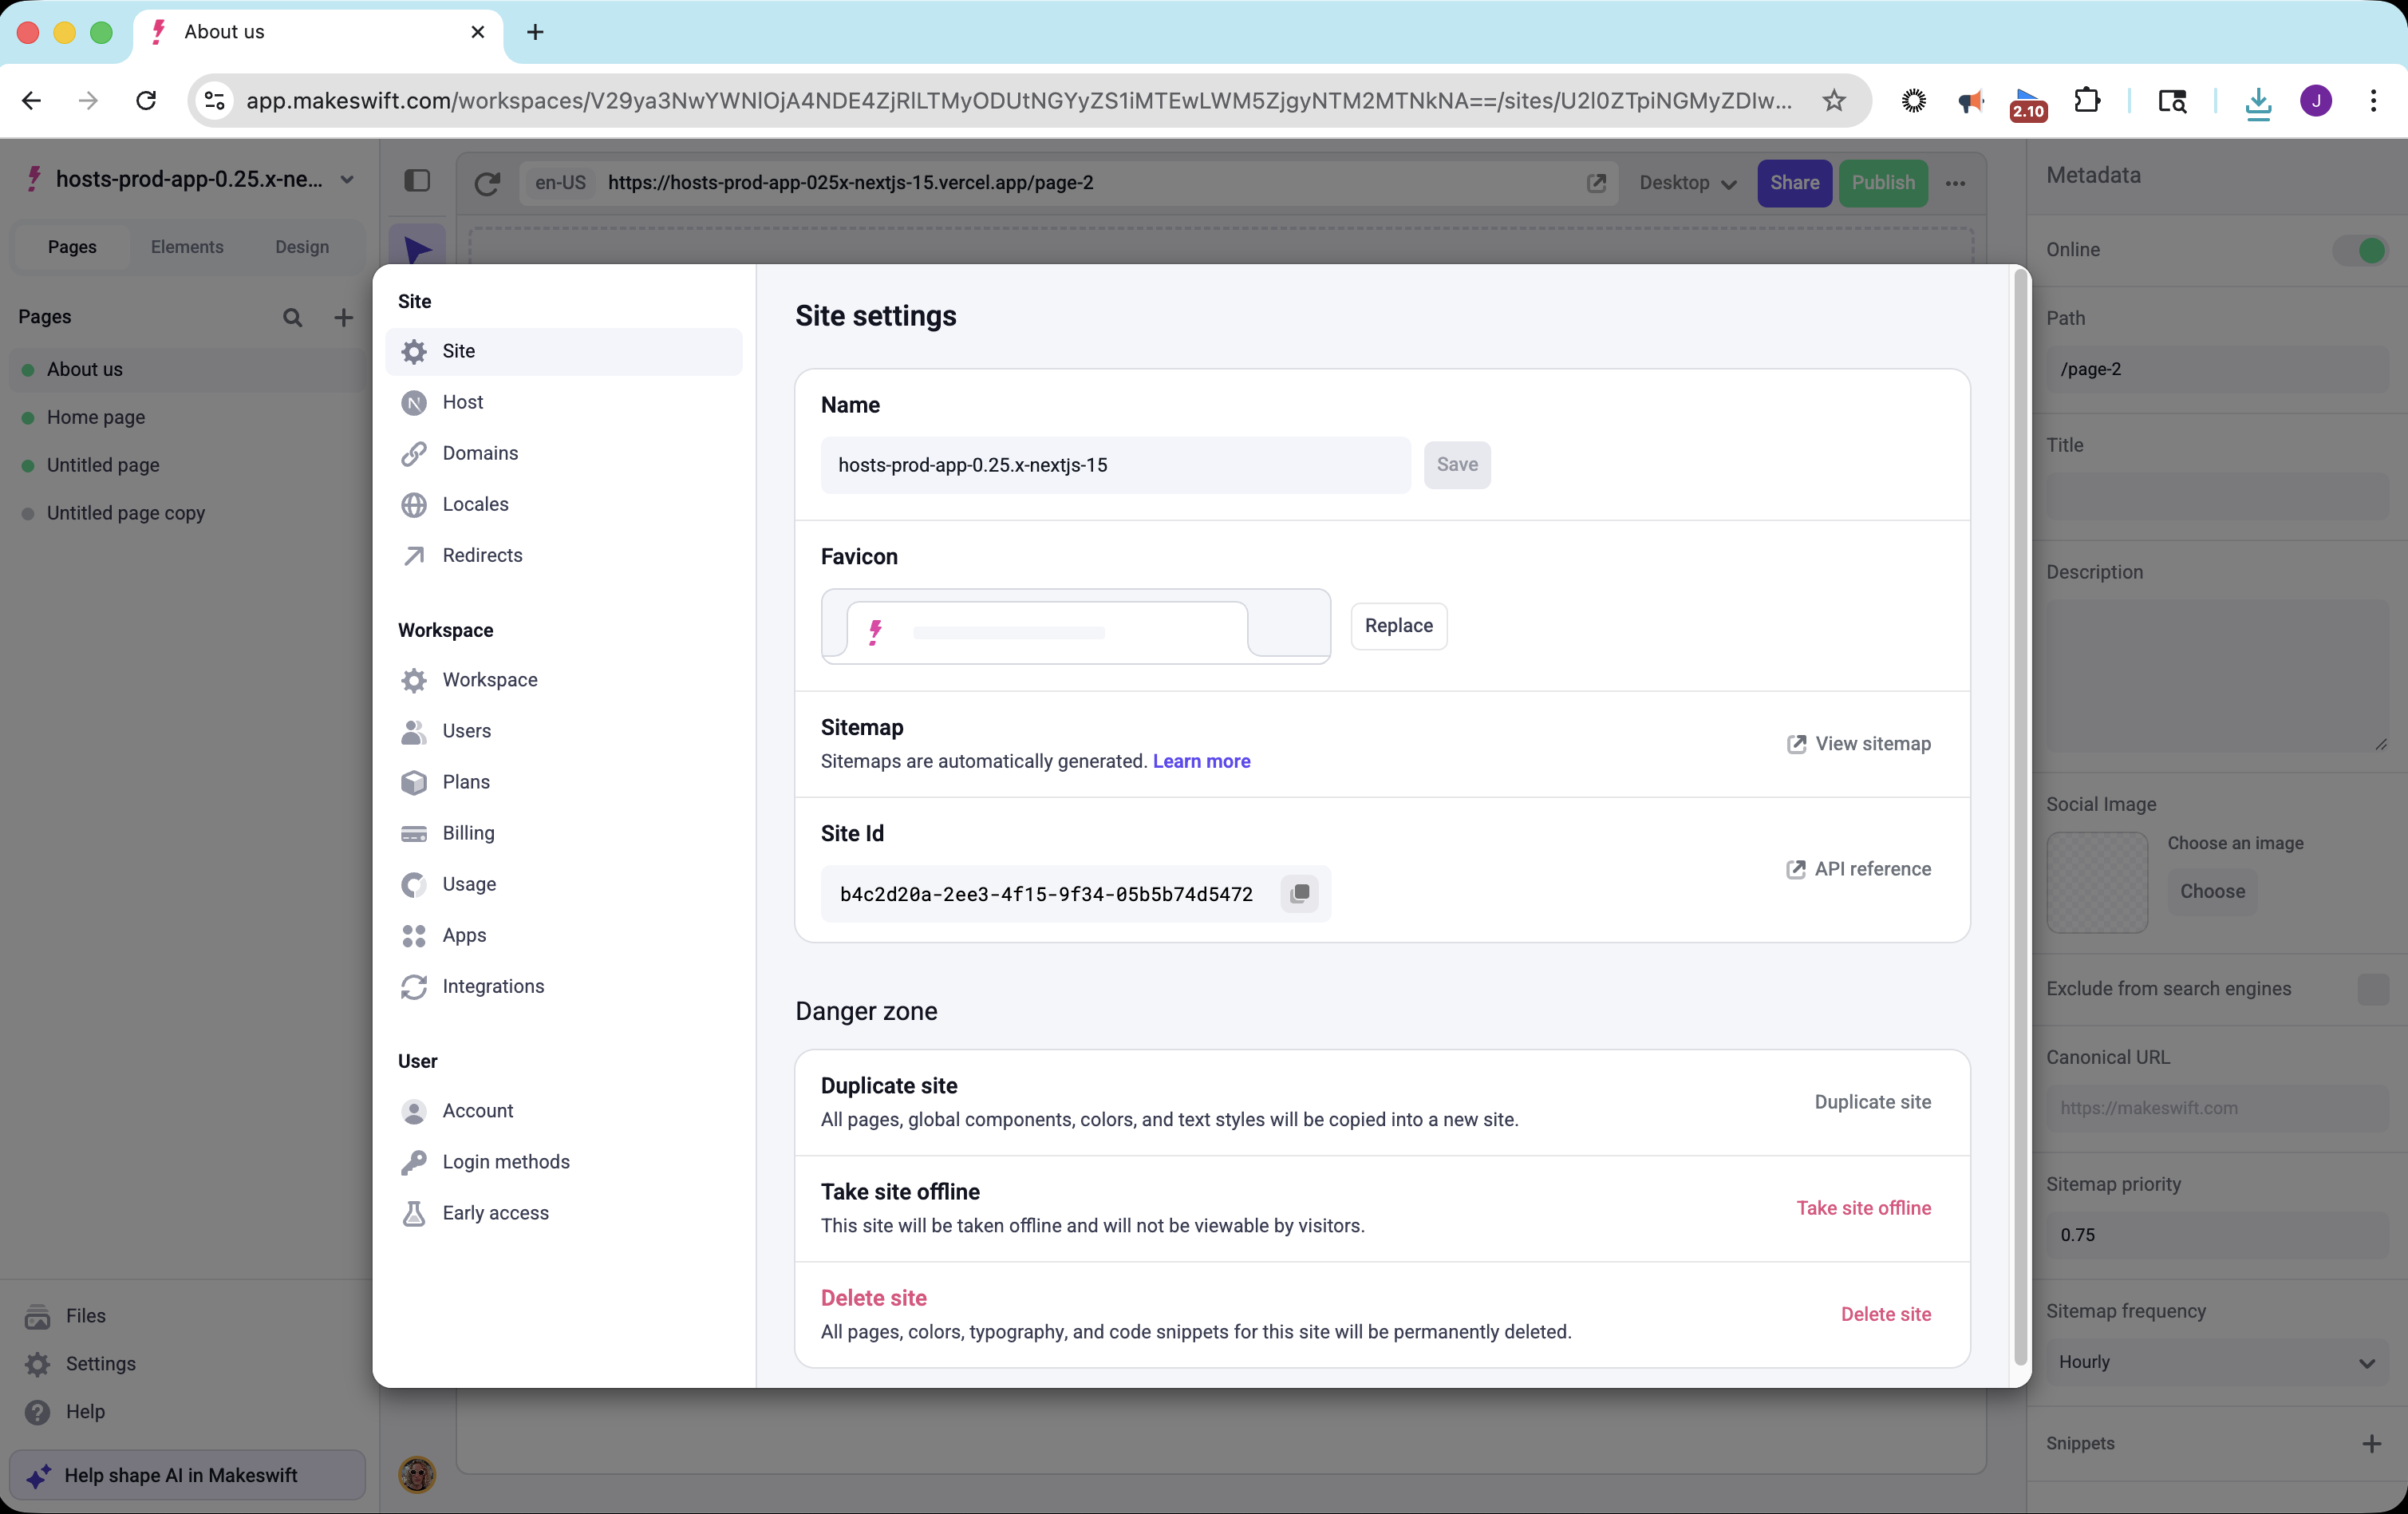 ## Get your Workspace ID
Some API endpoints operate at the workspace level and require a Workspace ID:
1. Open **Settings** in the Makeswift builder
2. Navigate to **Workspace** → **Workspace**
3. Copy the **Workspace Id** value
## Get your Workspace ID
Some API endpoints operate at the workspace level and require a Workspace ID:
1. Open **Settings** in the Makeswift builder
2. Navigate to **Workspace** → **Workspace**
3. Copy the **Workspace Id** value
 ## Using your API key
Include your API key in the `x-api-key` header with every request:
```bash theme={null}
curl https://api.makeswift.com/v2/sites \
-H "x-api-key: your-api-key"
```
Keep your API key secure and never expose it in client-side code. Use
environment variables to store your key in your application.
## Next steps
Now that you have your API key, you can start making requests to the API:
* [List your sites](/developer/reference/api/sites/list-sites)
* [List your pages](/developer/reference/api/pages/list-pages)
* [Configure locales](/developer/reference/api/locales/create-locale)
## Using your API key
Include your API key in the `x-api-key` header with every request:
```bash theme={null}
curl https://api.makeswift.com/v2/sites \
-H "x-api-key: your-api-key"
```
Keep your API key secure and never expose it in client-side code. Use
environment variables to store your key in your application.
## Next steps
Now that you have your API key, you can start making requests to the API:
* [List your sites](/developer/reference/api/sites/list-sites)
* [List your pages](/developer/reference/api/pages/list-pages)
* [Configure locales](/developer/reference/api/locales/create-locale)